Saturday, July 7, 2012

Meal time planning - 10 make ahead meals in less than 3 hours


Thumbs up for Mom!


I LOVE cooking! However, working full time during the day and well, working full time when I get home, it's a bit of a challenge to come up with a wholesome family meal.  It's also challenging when its just me, a finicky 11 year old and a toddler.  Years ago, when I was raising my two older daughters, I found our favorite meals were just too large.  So, I began freezing the extra portions.  It became so handy to have ready meals for those days  filled with ballet recitals, tee ball practice, soft ball practice and on and on . . . 

There are three recipes that I prepare ahead of time and freeze. They freeze very well and  using the recipes I provide you, you can make enough meals to cover 10 nights, and all can be made, yes, in less than three hours!! Now you have to be organized and perform like a production/assembly line.  I always shop weeks ahead and buy in bulk. Then one morning before the kids get up I start my cooking spree. My favorite time is in the winter.  I'll light up the fireplace, brew some yummy flavored coffee, play my favorite tunes  and then get cooking.

The recipes have common ingredients: tomato based sauce, cheese and noodles.  Varying the ingredients and you have three different recipes for Lasagna, Goulash and Stuffed Shells. You will want to have on hand the 8x8 pans, clear wrap, aluminum foil and extra large freezer bags for packaging the meals.
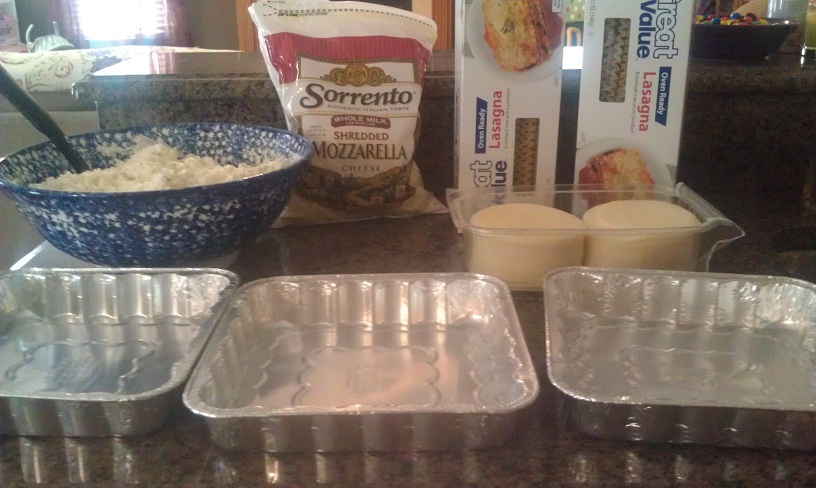
Lasagna Components
Lasagna is my all time favorite meal. My mother makes the very best. The recipe I follow is not hers, I can never do it justice!  I concocted my own recipe over the years and refined it to make it as simple and yummy as possible. It's layered with five different cheeses and I use Hunts Chunky Vegetable Pasta Sauce, because it allows me to sneak in vegetables and the kids have no idea!   I've had the most finickiest eaters fall in love with this lasagna and ask for more. This recipe will result in five 8x8 pans of Lasagna, serving an average family size of four. 

1.5 lbs ground beef
1 lb Italian Sausage (ground, mild)
2 cans (24 oz)  Hunts Chunky Vegetable Pasta Sauce
2 Tbsp Minced garlic
2 Tsp Onion Powder
2 Tsp Cumin
1/2 cup Parmesan Cheese
1 cup Chicken broth

Cheese filling (this recipe will cover enough for both the lasagna and stuffed shells):
1 container (3lb) Ricotta cheese
1 container (24 oz) Cottage cheese
1.5 Cups Shredded Mozzerella
1 Cup Parmesan Cheese
2 Tbsp Italian Seasoning
2 eggs, lightly beaten

Cheese layers:
Sliced Provolone cheese
Shredded Mozzerella Cheese

Pasta: Use you favorite brand of oven ready Lasagna noodles or you can cook regular noodles. I just find the oven ready to be a time saver and less clean up.

Brown the beef and Italian sausage on medium to low heat. It's important to keep the temperature low, otherwise you get big clumps of cooked meat (chewy and chunky - not good).  Cooking it low and slow allows you to break apart the meat into very fine crumbles.  Add the pasta sauce and remaining sauce ingredients, allow sauce to simmer. Adding the parmesan and chicken broth are key to this great recipe. My Aunt shared with me the secret of chicken broth in any tomato based pasta sauce, the flavor is so warm and yummy.  I use this same recipe to make spagetti sauce and I've never had any leftovers!  My kids sponge it up! I tend to cook by smell and taste, adding spices to meet my taste and smell expectations. Let the sauce simmer while you prepare the cheese mixture and begin boiling water for the noodles used in the goulash and stuffed shells.

Prepare cheese filling, by mixing all cheese filling ingredients in a very large bowl.  Set the assembly line of your lasagna!  Line up the pans, cheese filling, cheese layers, lasagna noodles and sauce and start layering. I always start off with a small amount of sauce on the bottom, followed by noodles, then spread the cheese mixture spread across the noodles,then layering with sliced provolone and finally shredded Mozzerella. Repeat until you fill the pan. The last layer should be the sauce followed by shredded mozzerella. You should have enough of the cheese mixture to prepare the stuffed shells later on. If not, you better run to the store!  In the pans shown below, I only managed two layers, which is perfectly fine for my family. If you go with a deeper sized pan you probably will end up with less than 5 pans. Reserve about half the mixture for the stuffed shells.


Lasagna Assembly line!

Once you have assembled the lasagna, set aside the meals to cool off while you start preparing the goulash and stuffed shells.  Remember this is power-cooking so there is no rest for the weary!  I prepare the goulash and the stuffed shells simultaneously.  There are three pots going, one browning the beef, and the other two boiling the noodles.

Goulash
1.5 lb ground beef
2 cans tomato soup
2 cans (15 oz) whole kernel corn
4 Tbsp Italian Seasoning4 cups uncooked elbow macaroni 
2 tsp onion powder

2 Tbsp minced garlic
1-2 cups shredded cheese


Brown Ground beef --slowly and on low heat-- with onion powder and minced garlic.  Drain.
Cook noodles, approximately 6 - 8 minutes. Until the noodles are chewy, not too soft, drain
In a large bowl, combine soup, tomato paste, Italian seasoning, noodles and ground beef. Stir in corn.Transfer to an ungreased 8X8 freezer baking dish and top with cheese. This recipe will make three 8x8 pans of goulash. This is a very quick and easy recipe, it seems a shame to call it goulash! The name invokes the image of Oliver in the Orphanage, "more goulash please!". Its a sad name isn't it?


Stuffed shells are my kids all time favorite meal. Whenever, my older daughters come to visit, this is their most requested meal.  It also the easiest!  I've tried variations of it, adding spinach or chicken, but just plain old cheese stuffing is the post popular.  This recipe will result in two 8x8 pans of Stuffed Shells
Stuffed shells components
Stuffed Shells

Remainder cheese mixture from Lasagna
Your favorite spaghetti sauce in a jar ( I used Bertollis Tomato and Basil)
Shredded mozzarella
Jumbo shells, drained and cooled
Cook shells 6 - 8 minutes, until chewy, not soft.Take cooled shell and use small spoon to scoop up cheese mixture and stuff the shell. Like with the lasagna, I put a small amount of sauce on the bottom of the pan. Keep stuffing those shells until you fill up the pan. Sometimes there are more noodles than cheese. I usually squeeze the empty shells in with the stuffed ones. No ones knows the difference! Once you have a pan full, sprinkle lots of mozzerella on top!

Stuffed shells assembly!
Now you have 10 prepared meals ready for freezing. Packaging is just as important as the cooking. This is done in assembly line formation! Get your clear wrap, aluminum foil and extra large ziplock bags ready!

10 Meals ready for packaging (l -r, Stuffed shells, Lasagna, Goulash)

First, wrap each meal with the clear wrap. I usually tear off sheets for each pan, but clear wrap is tricky, so you need enough space so the wrap won't tangle and stick to each other. Then, wrap with the aluminum foil. Press the aluminum foil around the edges to get a good seal.  Place each wrapped pan into the extra large ziplock bag. Zip lock the bag and press out any air before completely closing the bag.  Label the bag with contents and date. I find a Sharpie pen works best!

10 Meals ready for freezer!

Sometimes I have company while cooking.  Keeping a toddler entertained when power cooking is challenging.  I give Zoie my safest cooking utensils and let her go to work too!

Keeping little hands busy, while I cook!

Once everything has been packaged and labeled, it's ready for the freezer. Hope you made lots of space!  These meals can be safely frozen for about 3 months.  Now, if you timed this and followed proper assembly line procedures, you will have accomplished all 10 meals in three hours.  You have the rest of the day to enjoy!!

10 ready meals in the freezer!


When you are ready to cook, take out of the freezer that morning and allow to thaw in the refrigerator while you are at work or running your errands.  Each meal cooks at 350 degrees for 30 - 45 minutes (or until you see the sauce bubbling around the edges). Serve with a nice salad and garlic toast.

Dinner served!


Thursday, June 14, 2012

Antietam National Battlefield

Antietam National Battlefield
In April, I took the kids on a trek to the Antietam National Battlefield, which is located in Sharpsburg, MD approximately 2 1/2 hours North West of Washington DC.   I wouldn't call myself a Civil War buff, but this period in history generally interests me. I have never visited a battlefield so I didn't know what to expect.  The battlefield is well maintained by the National Park Service with a family pass costing $6.00 (for three days).  The battlefield tour is about eight and half miles long, a challenge to walk. But the tour is well marked and there is plenty of parking, so I'd recommend driving the tour. The guest center has a handy dandy map that shows you how to get around the battlefield.


The countryside is picturesque, dotted with little farms and pastures. I'm fairly certain the battlefield looks like it did that day.  Hard to believe it was the scene of unspeakable carnage.


On 17 September 1862, over 20,000 men were killed, injured or missing in the bloodiest one day battle in American history. The Antietam National Battlefield  plans to observe the 150th Anniversary of the battle on  September 15-17, 2012.
Bloody Lane, as viewed from Observation Tower
Once a farmer's lane to get from one field to the other, the lane was renamed, "Bloody Lane" because of the number of bodies covering it once the battle was over.


The battlefield is very kid and stroller friendly.  Great place for kids and adults to stretch their legs and enjoy the outdoors.  Katie loved running all over the place and I didn't have to worry about losing her because there was so much open space! The freedom felt wonderful.


Antietam National Cemetary

Plenty of Civil War memorabilia. Everywhere I turned there was a cannon!
Burnside Bridge

Walking from the parking lot to the bridge is a bit of a down hill walk. It's getting back up the hill that gets ya!  Make sure you have good walking shoes and someone to help push the stroller!

Bloody Lane, from a land lubbers view
While Katie climbed the 59 steps up the observation tower for aeral photo-ops, Zoie and I sat on a bench talking to one of the locals.  I love it when I find someone with a deep connection to the history.  Descendants from the war still live in the surrounding community.  Since I come from a military family, I find it amazing when people have such deep roots. He recommended hitting the Gettysburg National Battlefield, so I think that will be in our family bucket list!  However, his best recommendation by far was a little ice cream shoppe in Sharpsburg.  He told me the ice cream was a little pricey but well worth it.


Nutter's Ice Cream Shop


The Nutter's Ice Cream parlour is located in downtown Sharpsburg which is this cute little town, reminding me a little of Mayberry RFD.  The local Boy Scouts were selling flowers on one corner and little shops and businesses lined the streets. It was very quaint.  As with most small towns, parking was a bit of challenge, but the promise of "the very best" ice cream kept us magnetized.  Katie and I both ordered two scoops of ice cream.  I was quite surprised when the total cost came out to be $3.50. I had to be sure she counted both orders.  I'm not sure what the gentleman meant by "pricey", but we (Zoie included) enjoyed every bite!


Antietam National Battlefield is located at:
5831 Dunker Church Road

Sharpsburg, MD 21782
http://www.nps.gov/anti/index.htm

Tuesday, June 12, 2012

Single mom, single income, endless possibilities

Calvert Cliffs State Park, Lusby Md
For most single moms and grandmoms, finding things to do on a limited income can be a bit challenging. Let me introduce you to the world of State Parks.  I had no idea how cool and inexpensive they can be!  The National Park Service has a great website, http://www.nps.gov/index.htm which allows you to look for parks near you.  I happen to live near Calvert Cliffs State Park, so I packed up the kids, a picnic, a few essentials and off we went!

Katie is very excited about this hike,
 no really!
Calvert Cliffs State Park is located in Southern Maryland and is well known among the locals for its fossil hunting. Visitors are encouraged to hunt for fossils along the beach area and they can keep what they find. Calvert Cliffs State Park charges $5.00 per vehicle and is open from sunrise to sunset.

There are several hiking trails, all nicely marked for us novice hikers.  We selected the 2 mile hike to the beach. The marked paths are well maintained and the path was stroller friendly. There were a couple of areas on the trail where tree roots and sand pits became a minor encumberance.  But Katie and I  managed easily around them.  Zoie enjoyed the adventure!

Along the path, there is plenty of scenery, beautiful flowers and trees, and pretty little streams.

Look Mom, flowers!
 
Pretty little stream!

After the short hike, pushing a stroller and herding a somewhat grumpy eleven year old, we finally made it to the beach (about 45 minutes).  The wind was whipping and the Chesapeake Bay was at high tide, which made it a little difficult to dig for fossils. Highly recommend checking the tide tables before going to this park. I understand prime digging time is at low tide. We dug around for about 45 minutes, the most exciting find was a dead bird (I don't understand kids and their attraction to dead things). Anyway, we headed back to the park for our picnic and some playground time.

Considering the cost of gas, $5.00 park fee and the PBJ picnic, I'd say the entire trip cost us less than $25.00, but well worth every penny!!  If you are considering hiking, don't make it too fancy. Wear comfortable clothes and walking shoes. A hat  and sunshades are a good idea. Pack a sweet little picnic, small and affordable: PBJ sandwiches, chips, cookies, fruit, juice and water.  Believe me, after a long walk, that picnic was like manna from heaven!!

Chesapeake Bay shoreline

For single moms/grandmoms new to hiking, I highly recommend packing the following items (especially when traveling with a toddler) and take it with you on the hike:
Water - carry at least two bottles per person
Wipes (and extra diapers)
Snacks (we were so hungry and I left the picnic in the car!)
Towels to sit on and wipe down sandy faces and feet.
Sunscreen, Insect repellent.


Calvert Cliffs State Park is located at:
9500 H. G. Trueman Road
Lusby, Maryland


Neat little playground, with plenty to do for all ages!